

A flat gold logo on a laser print needs toner-reactive foil and a heated-roller laminator suitable for this type of transfer. A design transferred by a heated die needs hot-stamping foil and the corresponding equipment. Gold colour and heat alone do not make these materials interchangeable.
You also need to decide which part of the sheet to cover with foil. Foil cannot distinguish a ‘logo’ from ‘contact details’. If other eligible toner sits beneath it, that toner can turn gold too.
What defines the design: toner or a die?
Look at where each process holds the shape of the future gold mark. That tells you which foil to look for.
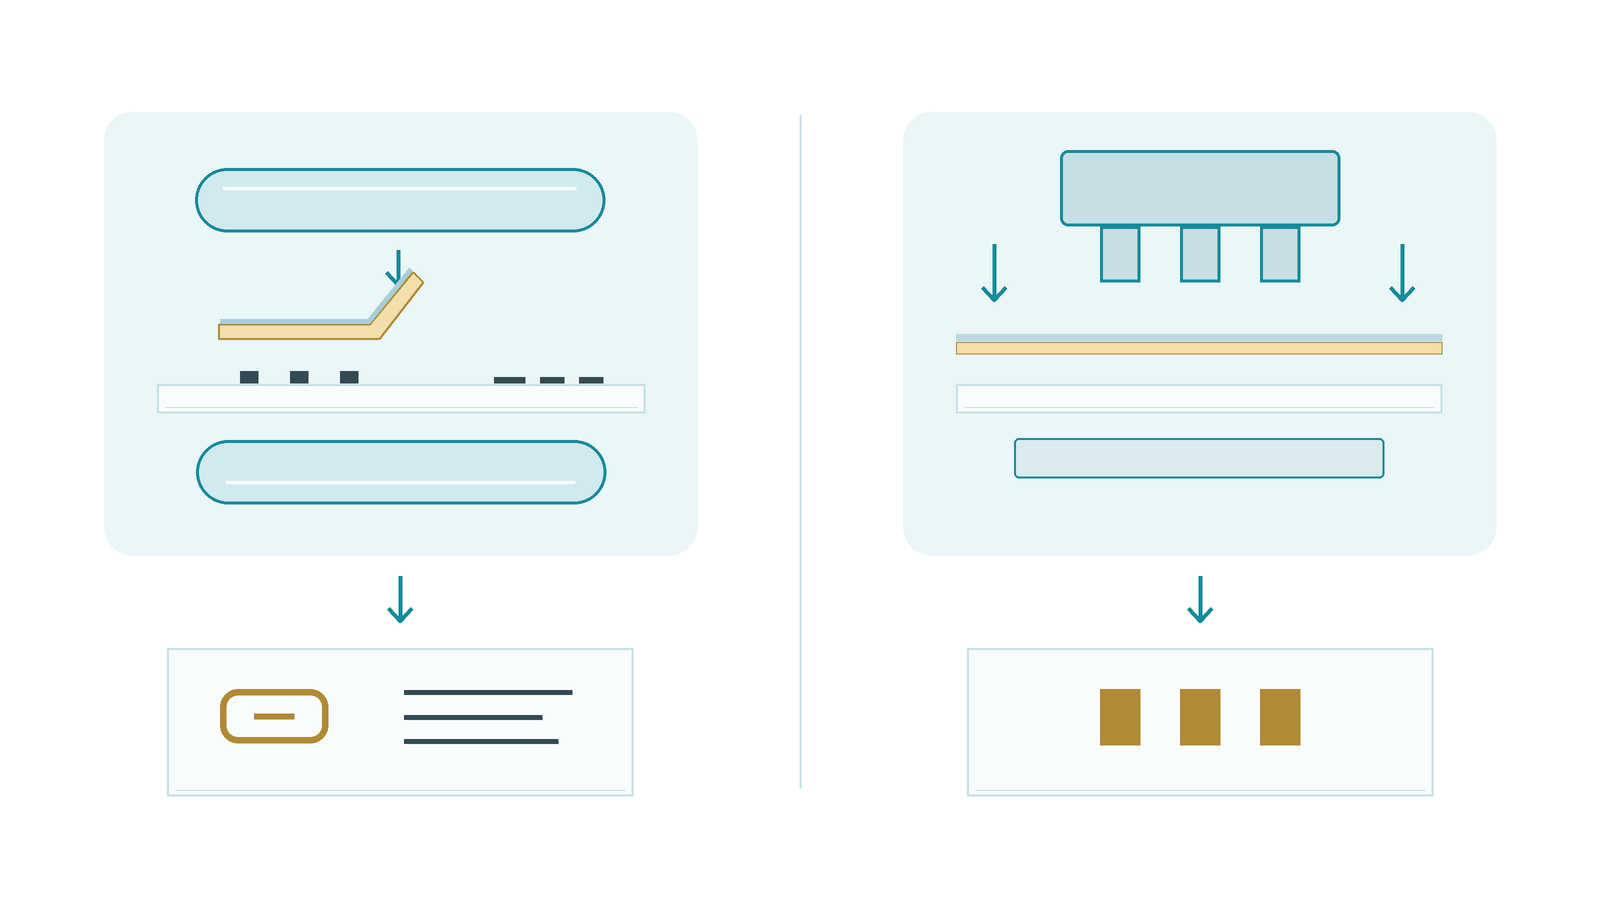
Left: foil transfers onto the toner areas it covers. Right: a heated die stamps the foil; the impression follows its working shape.
Transfer onto toner
The design is already printed on the paper
↓ Heat and pressure
Carrier film — upper blue strip
Decorative layer — thin gold strip below the carrier
Toner defines the design
↓ After carrier removal: decoration on toner
The foil contacts the laser print. In this process, its decorative layer transfers onto eligible toner within the covered area. There is no separate logo die: change the printed design and you change the shape of the decoration.
Hot stamping
The design is built into the shape of the tool
↓ Raised die features define the design
Carrier film — upper blue strip
Decorative layer — thin gold strip below the carrier
↓ After carrier removal: decoration at the die contact areas
The heated, raised features of the die press the foil onto the paper and transfer decoration at the contact areas. A toner logo is not needed to form this design. Changing the mark itself means changing the shape of the die.
Schematic cross-sections, not to scale: layers are separated for clarity. They show what forms the design, rather than every layer of the foil or the construction of a particular machine. Carrier removal represents completion of the transfer; its timing depends on the specific system.
Black does not necessarily mean toner
An ordinary black inkjet print does not replace toner in the process shown. If you only have that print and a laminator, buying toner-reactive foil does not complete the setup. You need a suitable laser print on paper appropriate for the chosen printing and foiling process, or a deliberately chosen alternative decoration method. Adhesive and gel systems also exist; this comparison covers toner transfer and die hot stamping specifically.
Three different boundaries: artwork, foil and finished decoration
Imagine a 90 × 50 mm paper invitation: a toner logo within 20 × 10 mm bounds on the left, and black toner text on the right. The job calls for a gold logo without a pressed impression, while the text must stay black. We assume the paper is suitable for the selected process.
Coordinates start at the top-left corner: x runs right, y runs down. The mark is illustrative; its outer bounds match the stated logo size.
Printed artwork
90 × 50 mm invitation
Black outline: toner
Logo: x 8…28, y 8…18 mm. The other toner text starts at x = 45 mm.
Foil footprint
90 × 50 mm invitation
Blue area: foil footprint
Foil: x 6…30, y 6…20 mm — a 24 × 14 mm rectangle. Text starting at x = 45 mm stays outside it.
Intended result
90 × 50 mm invitation
Gold outline: decoration
The mark beneath the foil turns gold; the text on the right stays black. The blue rectangle is not part of the finished decoration.
Hypothetical top views. In the middle diagram, the foil is shown as transparent so that the logo beneath it remains visible. The right diagram shows the intended outcome for eligible toner and proper transfer, not a tested MyPrint sample.
Potential decoration area = eligible toner covered by foil.
Here, the foil extends 2 mm beyond each side of the logo: (24 − 20) ÷ 2 and (14 − 10) ÷ 2. That allowance only makes the geometry clear; it is not a positioning tolerance or a machine setting. Whether that placement can be maintained reliably during feeding depends on the actual construction.
24 × 14 = 336 mm²
area covered by the foil piece
90 × 50 = 4500 mm²
area of the entire face
This compares areas, not savings. Consumption from a roll also depends on roll width, layout, feeding and waste.
What if you cover the whole invitation?
90 × 50 mm invitation
Blue area: foil; gold mark and text: potential decoration
If you cover the entire face and both elements are printed with eligible toner, foil can transfer to both the logo and the text. That is why both areas are gold in the diagram. An object's name in the file, or the designer's intention, does not separate the contact details from the logo.
First, separate what should turn gold from what should stay black in the artwork. Temperature can affect transfer quality, but lowering it or making another pass cannot selectively decorate just one area of the same eligible toner beneath the same foil. If the foil cannot be positioned and held reliably enough, move the nearby text farther away or change the decoration plan. Plan foil retention and feeding only within a construction supported by the actual machine: a footprint diagram is not an instruction to feed a loose piece, add tape or use an arbitrary carrier envelope.
‘I want a pressed impression I can feel’ changes the job
Flat metallic decoration and an impression you can feel with a finger are different requirements. A pressed impression needs a process with appropriate tooling, pressure and a suitable material. Choose stamping equipment and tooling for that requirement; another pass through a laminator does not replace them.
Hot stamping itself can also be flat. Raised die features form the design, but that does not mean the finished mark will always have raised relief.
What to choose for your job
Starting point
A laser-printed logo with flat gold decorationDecision
Toner-reactive foil, with coverage that leaves unwanted toner outside it. This is the appropriate route for the invitation above.Starting point
Only a black inkjet print and a laminatorDecision
Prepare a suitable toner print or choose a separate, documented decoration system. The colour of the ink does not turn it into toner.Starting point
A die-defined design or a requested pressed impressionDecision
Stamping foil for the relevant material, plus equipment and tooling for the intended result. A roll of foil alone does not give a laminator a stamping function.In the MyPrint catalogue, My Print Gold Foil for toner transfer (11589) belongs to the first process: its product page explicitly identifies toner-reactive foil for a laminator. This is a specific material type for that job, rather than confirmation of compatibility with every roller system or paper.
For the separate paper-stamping process, there is My Print Gold SA09 for hot stamping on paper (11603). ‘For paper’ matters here: do not select another gold grade intended for plastic or leather by colour alone.
For the invitation described, choose the toner process first, then isolate the logo area with the foil footprint. If the relief requirement or the material changes, reconsider the process and tooling. Take temperature and feeding instructions from the specific machine and materials selected; the paper invitation example is not a recipe for textured card or bookcloth.